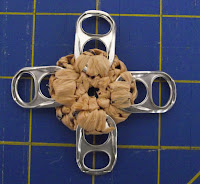
Personally, deciding on what piece(s) of jewelry to wear is just as important as deciding on what outfit to wear. And, big jewelry pieces are definitely the fad right now. We see it all the time on tv, in the magazines as well as our own day to day social settings.
That's exactly the concept behind my newest pop/pull tab design - Pop Tab Ring of Elegance. This ring proves that recycling can be upcycled to something beautiful.
This ring can easily be crocheted in less than 30 minutes. This is pattern is perfect for all skill levels. All you need to know is how to make a chain, the single crochet and reverse single crochet.
Materials needed:
- 8 pop/pull tabs
- Size G crochet hook
- 1 plastic bag of choice
- Button or Pin or whatever you want to use for complimenting the pop tabs. Let your creative juices flow. Here I've used a button that I removed from an old suit jacket that was tossed in the trash. But, really anything can be used.
- Craft needle
Pattern:
Ring Base - Make 2:
Round 1: Using the magic circle, make 8 single crochet stitches in the ring (close the ring not tightly, leave a big enough hole for the button hole to go through), slip stitch in first single crochet stitch to complete round.
Round 2: Chain 1 and make a single crochet in same stitch, make 2 single crochet stitches in each stitch around, slip stitch in first single crochet stitch to complete round.
Round 3: (reverse single crochet) Chain 1, now working in the opposite direction make a single crochet stitch in each stitch around and join with a slip stitch in first single crochet stitch to complete round. Fasten off and weave in both ends.
Now for the finger piece:
Row 1: Chain 3, single crochet in second chain from hook and in last chain, turn.
Row 2: Chain 1, single crochet in first stitch and in next stitch.
Repeat row 2 until desired fit.
Determine fit by placing an end on one side of finger then wrap it around ending on other side of finger. Don't put the ends together because you want a tight fit as there is some stretch with plastic yarn.
Whip stitch the ends to the right side of a ring base. Noticed I said 'right side' because the wrong side will be sewn to the back of the pop/pull tabs.
On the other ring base we'll be attaching the pop/pull tabs. Do this by stitching the right side of 4 pop/pull tabs to the wrong side like clock hands at 12, 3, 6 and 9.
Then sew the remaining 4 pop/pull tabs in the empty spaces between the existing pop/pull tabs.
Don't worry about how it looks because your stitching will be hidden with the other ring base.
Now place your button on top of the same ring base poking the stitch hole through the middle circle and stitch it to the ring base. Remember, it doesn't matter how it looks because your stitching will be hidden.
You now have 2 separate finished pieces.
Viola - your ring is ready to wear!!!!
This pattern works great for those that are not into pop/pull tabs yet. Just crochet one ring base and finish it by sewing either an oversized button or smaller button to the top. It still looks great and gives you another fun flirty upcycled jewelry piece.
I would love to see pics of rings you've made with this pattern. Send them to me at plastiquerecreations@yahoo.com or twooleydesigns@gmail.com.
You can also find me on Ravelry under 'crochooley'.
MOVE OVER YARN - MAKE ROOM FOR PLARN!!!!


This comment has been removed by the author.
ReplyDeleteCool project and I love that it uses not only recycled pop tabs but also plastic bags. I stumbled the post at SU for you too. Best wishes and thanks for sharing such wonderful projects
ReplyDeleteI love this! Thank you for giving these instructions!
ReplyDeleteWhat a great way to recycle!
ReplyDeleteI think this idea is great! Thanks for the great instructions also!
ReplyDeleteThank you for all the compliments. However, not everything shares the same thoughts. For your reading pleasure, here is the link to read other comments made on this pattern from the AllFreeCrochet website:
ReplyDeletehttp://www.allfreecrochet.com/Crochet-Jewelry/Plarn-Pop-Tab-Ring/ml/1