Showing posts with label how to make plastic yarn. Show all posts

Saturday, November 12, 2011

Free Plarn Pattern - Pop Tab Ring of Elegance


Personally, deciding on what piece(s) of jewelry to wear is just as important as deciding on what outfit to wear.    And, big jewelry pieces are definitely the fad right now.  We see it all the time on tv, in the magazines as well as our own day to day social settings. 

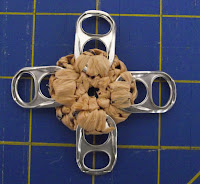
That's exactly the concept behind my newest pop/pull tab design - Pop Tab Ring of Elegance.  This ring proves that recycling can be upcycled to something beautiful.


This ring can easily be crocheted in less than 30 minutes.  This is pattern is perfect for all skill levels.  All you need to know is how to make a chain, the single crochet and reverse single crochet. 


Materials needed:
  • 8 pop/pull tabs
  • Size G crochet hook
  • 1 plastic bag of choice
  • Button or Pin or whatever you want to use for complimenting the pop tabs.    Let your creative juices flow.   Here I've used a button that I removed from an old suit jacket that was tossed in the trash.   But, really anything can be used. 
  • Craft needle

Pattern:


Ring Base - Make 2: 
Round 1:  Using the magic circle, make 8 single crochet stitches in the ring (close the ring not tightly, leave a big enough hole for the button hole to go through), slip stitch in first single crochet stitch to complete round. 

Round 2:  Chain 1 and make a single crochet in same stitch, make 2 single crochet stitches in each stitch around, slip stitch in first single crochet stitch to complete round.

Round 3: (reverse single crochet) Chain 1, now working in the opposite direction make a single crochet stitch in each stitch around and join with a slip stitch in first single crochet stitch to complete round.  Fasten off and weave in both ends.


Now for the finger piece:
Row 1:  Chain 3, single crochet in second chain from hook and in last chain, turn.

Row 2:  Chain 1, single crochet in first stitch and in next stitch.
Repeat row 2 until desired fit. 
Determine fit by placing an end on one side of finger then wrap it around ending on other side of finger.  Don't put the ends together because you want a tight fit as there is some stretch with plastic yarn.


Whip stitch the ends to the right side of a ring base.  Noticed I said 'right side' because the wrong side will be sewn to the back of the pop/pull tabs. 


On the other ring base we'll be attaching the pop/pull tabs.  Do this by stitching the right side of 4 pop/pull tabs to the wrong side like clock  hands at 12, 3, 6 and 9.  


Then sew the remaining 4 pop/pull tabs in the empty spaces between the existing pop/pull tabs.  


Don't worry about how it looks because your stitching will be hidden with the other ring base.

Now place your button on top of the same ring base poking the stitch hole through the middle circle and stitch it to the ring base.  Remember, it doesn't matter how it looks because your stitching will be hidden.  
 

You now have 2 separate finished pieces. 


To finish the ring, stitch the 2 ring bases together.  The easiest stitching method I have found is first insert your needle from behind one of the  pop/pull tabs of your choice through a stitch in round 2 to the front.  Then insert the needle in the next stitch over through the middle and out the back of the bottom ring base.  Now working on the bottom, insert the needle in next stitch over, through the middle and to the top of ring.  Repeat this completely around the ring base until both ring bases are stitched together.  You may need to repeat the stitching for a second round just for added security.


Viola - your ring is ready to wear!!!!


Non Pop/Pull Tab Idea:

This pattern works great for those that are not into pop/pull tabs yet.  Just crochet one ring base and finish it by sewing either an oversized button or smaller button to the top.  It still looks great and gives you another fun flirty upcycled jewelry piece.


I would love to see pics of rings you've made with this pattern.    Send them to me at plastiquerecreations@yahoo.com or twooleydesigns@gmail.com.   

You can also find me on Ravelry under 'crochooley'.


MOVE OVER YARN - MAKE ROOM FOR PLARN!!!!

Friday, August 19, 2011

Free Pop Tab Bracelet Crochet Pattern - Lazy 'P' Pop Tab Plarn Bracelet

Pop Tab Bracelets are one of my favorite fashion accessories so I am always thinking of new designs and techniques to create with them.  

I recently completed a new plarn handbag using the traditional Puff Stitch as part of the design.  Impressed by the character the stitch offered to my handbag, it has been added to my list of favorite stitches.  
As I was thinking of my next pop tab bracelet design, I decided to see what a pop tab bracelet would look like using the traditional Puff Stitch.  At first, it lacked the finesse I was expecting.  Then I decided to make the chain 1 through the next pop tab giving the appearance the Puff Stitch was 'laying down on the job' so to speak.  That was it. 

That's how I came up with the name of Lazy 'P'. 

Made with Dollar Tree plastic yarn aka plarn


SKILL LEVEL:  Easy
MATERIALS:
·        Crochet Hook – Size G
·        Plastic Yarn:  Approximately 2 standard size plastic grocery bags (width of strip – approx  ¾”)
·         Approx 18-22 Pop/Pull Tabs (clean & consistent in size).  The # needed will be determined by size of wrist
·        (optional) Craft Needle for weaving in ends
Important Note:   Not all plastic is made the same.  When using plarn, achieving the desired size or gauge is dependent on the texture, thickness and strip width of the plastic yarn. 


ABBREVIATIONS

ch(s) = chain(s)

po = plarn over

sl = slip

st(s) = stitch(es)


Helpful Tips:
·        Read through pattern instructions before beginning.
·        Plastic in general is susceptible to ripping/tearing due to its very nature.   
                o   Weaving in ends - it is best to maneuver your craft needle behind a puff st and not through the stitch to avoid splitting the plastic yarn.
      ·        The edged hole of the pop tab will be always be placed behind a non-edged hole. 
 

Special Stitch:
Puff Stitch:  Po, insert hook in pop tab, po, pull through and bring plarn up higher than normal (3 loops on hook), po, insert hook in same pop tab, po, pull through and bring plarn up to height of rest of stitches (5 loops on hook), *po, insert hook once again into the same pop tab, po, pull through and bring plarn up to height of rest of stitches (7 loops on hook), [IMPORTANT NOTE:  For more puff,  repeat from * until enough puff is achieved.] po, pull plarn through ALL loops on hook. 

Instructions:
With 2 pop tabs overlapped, join plarn with a sl st in overlapped hole, ch 1, place a new pop tab under previous pop tab, make a puff st in that hole.


*Place another pop tab under the previous pop tab, in new overlapped hole make a sl st, ch1 and Puff st.


*Continue overlapping pattern until desired length is achieved ending in last overlapped hole.


Continue until bracelet is long enough to fit around wrist.  [Fitting Tip – wrap bracelet around wrist overlapping the first and last pop tab.  There is some stretch so no additional tabs are needed to maneuver finished bracelet over hand.] 

Remove hook from st (make a big enough loop so completed work doesn’t come out because you’ll be coming back to it).
Working on opposite side, in 1st overlapped hole join with a *sl st, ch 1 and Puff st.  *Repeat pattern in each overlapped hole to last overlapped hole.   Before connecting the ends, do a second fitting.

                                                             The 1st  hole is skipped as it will be worked when forming the circle.


Form Circle - Overlap the ends together to form a circle.    
Both ends pulled together
 

*Work pattern of sl st, ch1 and puff st in this hole. Finish by making a sl st in 1st puff st.  Fasten off, weave in ends behind the puff st.


*Repeat pattern on opposite side.


ENJOY YOUR NEW FASHION ACCESSORY!! !


Download the Lazy 'P' Pop Tab Plarn Bracelet
(This link will take you directly to my (Crochooley) Ravelry pattern page)

I would love for you to share pictures of your Lazy 'P' Pop Tab Bracelet with me whether it is made with plarn (plastic yarn), tarn (t-shirt yarn), blarn (blue jean yarn), harn (hosiery yarn) or even regular yarn. 

PERMISSIONS
Feel free to make and sell your finished product from this pattern.  LOL - I can't stop you anyway from doing it so I might as well offer you the permission.
However, please do not take credit or offer the pattern as your own.  Please direct them to this page.  If you have any trouble accessing the pattern, feel free to contact me at twooleydesigns@gmail.com and I will email the pattern to you.  

Friday, December 3, 2010

Pop Tab Bracelet Crochet-Plarn Along

Pop Tab Bracelets have become today's newest fashion jewelry accessory -


But this isn't just any ordinary pop tab bracelet, this is an eco friendly pop tab bracelet because it is made with plarn.

'Plarn' .. it is a commonly used word heard quite a bit in the crafting community. You can find write-ups and tutorials about it on various blogs and websites as well as in YouTube.
What exactly is Plarn? It is a very creative way to recycle plastic bags you bring home from the grocery store, retail stores, and even fast food restaurants.


The word 'Plarn' is derived from 2 words combined:  [Pl (plastic) + Arn (yarn) = Plarn] .


I recently hosted my first Crochet-Plarn Along and had so much fun with it I decided - Hey!!  let's squeeze one more in before saying good-bye to 2010 ....


This Crochet-Plarn Along will be in honor of those that are seeking a 'last minute gift idea' or have a 'hard to buy for person' on their gift list.


The skill level: Easy

This pattern is so super simple that even the newest of new crocheter can do - all you need is:


Materials Needed:
  • Crochet hook - size F
  • Approximately 14 pop tabs consistent in size 
  • 2 standard size plastic grocery bags or 1 of each color
and in less than 30 minutes you’ll have an adorable bracelet just like this.

(except if you're laughing too hard from watching something funny on TV or chatting away with friends ...all of which are completely acceptable and encouraged)


I will share the pattern in 2 sets beginning Tues, 12/7 and last posting on Sun, 12/12.


If you interested in participating, please leave me a comment or email me at plastiquerecreations@yahoo.com.

Find Plastique Recreations:

www.facebook.com/plastiqrecreat
www.twitter.com/plastiqrecreat
shop online at: http://www.crochooley.etsy.com/
http://www.flickr.com/photos/plastirecreations

Tuesday, April 28, 2009

How to Make Plastic Yarn (Continuous / Single-Strand Strip Cutting Method)

There are multiple strip methods you can use to make and connect plarn (plastic yarn) strips. The 3 methods I'm aware of are - 1) Double-Strand; 2) Continuous (Single-Strand) Strip and 3) Connecting Strip.


Tip: Any of the strip methods can also be used with fabric; t-shirts, etc..


Tutorial for cutting a Continuous (Single-Strand) Strip:Lay the bag out flat, straightening out the straps. Fold bag in half (folding bottom up to be even with the top) matching up the handles then a couple more times for easier cutting.


Cut straps off right at the base of the straps and cut off bottom seam of bag. Just a sliver is all that is needed.


Put your hand through the middle of the bag to pull it apart and lay flat as a tube. Fold this tube to within 1 inch from the top (I call the main fold the spine).


Continue the fold multiple times until your tube is small enough to make one cut. You’ll cut from the bottom to the top of the initial fold – not through the spine. Determining the width of you’re the strip is based on the needs your for your pattern. The rule of thumb is not less than 1”, 1 1/2 to 2” pieces are typical cut sizes.


Straighten out the strips – it almost looks like tentacles. Here comes the fun part – separate the strips by separating it at the spine. You can either lay it out on a flat surface or use one of your arms (I use the arm way which is why I'm suggesting it). To use your arm, take one hand at the beginning of the spine and separate each half.


Whether you lay it out on a flat surface or use your arm - to begin cutting place your scissors on the bottom half of the spine, angle your scissors in an upward motion to the next section over and cut. Continue cutting until you reach the other end. You should have a pile of one single continuous strip.


Making the Ball –
The easiest way I have found to make a ball is put your pointer and middle fingers together. Place the end of the strip between the fingers and begin wrapping the strips around both fingers about 5 times. Then pull off the fingers and begin wrapping the strips around it. Before you know it, your ball begins to take shape.


Copyright 2009 Plastique Recreations. All rights reserved.

How to Make Plastic Yarn (Double-Strand Cutting and Connecting Tutorial)

There are multiple strip methods you can use to make and connect plarn (plastic yarn) strips.

The 3 methods I'm aware of are - 1) Double-Strand; 2) Continuous (Single-Strand) Strip and 3) Connecting Strip.


Tip: Any of the strip methods can also be used for fabric; pillow cases, t-shirts, etc..


Tutorial for the Double Strand Method:


Cutting Strips -
Lay the bag out flat, straightening out the straps.


Fold bag in half (folding bottom up to be even with the top) matching up the handles then a couple more times for easier cutting.


Cut straps off at the base of the straps and bottom seam. Cut off bottom seam of bag. Just a sliver is all that is needed.


Put your hand through the middle of the bag to pull it apart and lay flat as a tube. Fold the tube in half then a few more times until your tube is small enough to make one cut. The strips are cut to the size needed to meet your pattern needs. (The rule of thumb is not any less than 1”. 1 1/2 to 2” pieces are typical cut sizes.)


Connecting Strips –
I have had excellent success with this 'visual' teaching method of showing how to connect the strips: Hang 2 strips on your hand/arm


Using your opposite hand, reach through the middle of the first strip to grab the bottom of the 2nd strip and pull through. (The picture shows the same hand but I didn't have another set of hands available.)


Drop the 1st strip from your hand. (In the picture above it will be the strip in the middle.) You now have something that resembles a ‘T’.


Now take the bottom strip (In the picture above it will be the strip closest to the fingers) and lay it over the strip still sitting on your hand.


    Now grab the strip closest to the fingers (strip on bottom) with one hand and pull to form a small knot. (Reminder: Your primary objective is to avoid breaking the strip which is very easy to do if you pull too tight).


    Keep adding strips using this same method (eventually you’ll grasp the concept of connecting the strips and won’t have to use the ‘hand method’).


    Important: Here are some important tips to remember:
    · Avoid ripping the strip from pulling too tight.
    · Keep the 2-strand strip even.
    · Make the knot as small as you can. You’ll find that some strips will knot gracefully but believe me there’s always those few that will make you work for it. When this happens you just have to do a little pulling and tugging on the knot.


    Forming the Ball –The easiest way I have found to make a ball is put your pointer and middle fingers together. Place the end of the strip between the fingers and begin wrapping the strips around both fingers about 5 times. Then pull off the fingers and begin wrapping the strips around it. Before you know it, your ball begins to take shape. (Side Note: To avoid tangles, I usually start making the ball after I have 6-10 strips made, then make another 6-10 strips and wrap.)


    Copyright 2009 Plastique Recreations. All rights reserved.