Showing posts with label pop tab. Show all posts

Friday, July 19, 2013

Free Crochet Pattern - Party Favor-Plarn Pop Tab Bracelet


This design was created from a request I received for an easy-to-crochet pop tab bracelet pattern.  The requestor is throwing her tween daughter a birthday party and wanted to give as gifts each of girl a pop tab bracelet.  But, she was on a limited budget.   The pattern needed to be easy and quick to make. 


After practicing various stitches and techniques, realized I was trying too hard. Finally this is what I came up with ...  in less than 15 minutes you have a cute-fun pop tab bracelet.   

While I was having fun, decided to see what it would look like made with other types of recycled yarn - e.g. hosiery yarn, t-shirt yarn and sheets yarn. It looks fabulous ..  sorry I don't have pics. I will have to make up more and post the pics.     

So if you're looking for party favor gift idea, here it is.   


Materials:

Instructions:

Place 2 pull tabs with right sides together - matching same size holes - wrong side facing you, join plarn with a slip stitch, chain 1, single crochet in same hole. 2 single crochet stitches in next hole, chain 1, turn.


*Open the pull tabs to flatten, place another pull tab with right sides together - matching same size holes - wrong side facing you, 2 single crochet stitches in same hole, 2 single crochet stitches in next hole.


*Repeat same steps, keep adding pop tabs until you have the desired length.  


To finish - match right sides together of first and last pop tabs,  2 single crochet stitches in same hole, 2 single crochet stitches in next hole.  Fasten off and weave in ends.


That's it.   Please share your bracelet pics.


This pattern is for your personal use only.   This pattern may not be sold, published, reproduced-mechanically or electronically, or by any other means, including photocopying from any website(s) or electronic mailing lists, etc… Please do not offer, sell or distribute this pattern in any way to anyone else.

Copyright © 2013 Plastique Recreations
Designer, Teresa Wooley
Email: plastiquerecreations@yahoo.com

Saturday, November 12, 2011

Free Plarn Pattern - Pop Tab Ring of Elegance


Personally, deciding on what piece(s) of jewelry to wear is just as important as deciding on what outfit to wear.    And, big jewelry pieces are definitely the fad right now.  We see it all the time on tv, in the magazines as well as our own day to day social settings. 

That's exactly the concept behind my newest pop/pull tab design - Pop Tab Ring of Elegance.  This ring proves that recycling can be upcycled to something beautiful.


This ring can easily be crocheted in less than 30 minutes.  This is pattern is perfect for all skill levels.  All you need to know is how to make a chain, the single crochet and reverse single crochet. 


Materials needed:
  • 8 pop/pull tabs
  • Size G crochet hook
  • 1 plastic bag of choice
  • Button or Pin or whatever you want to use for complimenting the pop tabs.    Let your creative juices flow.   Here I've used a button that I removed from an old suit jacket that was tossed in the trash.   But, really anything can be used. 
  • Craft needle

Pattern:


Ring Base - Make 2: 
Round 1:  Using the magic circle, make 8 single crochet stitches in the ring (close the ring not tightly, leave a big enough hole for the button hole to go through), slip stitch in first single crochet stitch to complete round. 

Round 2:  Chain 1 and make a single crochet in same stitch, make 2 single crochet stitches in each stitch around, slip stitch in first single crochet stitch to complete round.

Round 3: (reverse single crochet) Chain 1, now working in the opposite direction make a single crochet stitch in each stitch around and join with a slip stitch in first single crochet stitch to complete round.  Fasten off and weave in both ends.


Now for the finger piece:
Row 1:  Chain 3, single crochet in second chain from hook and in last chain, turn.

Row 2:  Chain 1, single crochet in first stitch and in next stitch.
Repeat row 2 until desired fit. 
Determine fit by placing an end on one side of finger then wrap it around ending on other side of finger.  Don't put the ends together because you want a tight fit as there is some stretch with plastic yarn.


Whip stitch the ends to the right side of a ring base.  Noticed I said 'right side' because the wrong side will be sewn to the back of the pop/pull tabs. 


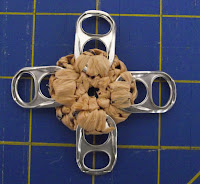
On the other ring base we'll be attaching the pop/pull tabs.  Do this by stitching the right side of 4 pop/pull tabs to the wrong side like clock  hands at 12, 3, 6 and 9.  


Then sew the remaining 4 pop/pull tabs in the empty spaces between the existing pop/pull tabs.  


Don't worry about how it looks because your stitching will be hidden with the other ring base.

Now place your button on top of the same ring base poking the stitch hole through the middle circle and stitch it to the ring base.  Remember, it doesn't matter how it looks because your stitching will be hidden.  
 

You now have 2 separate finished pieces. 


To finish the ring, stitch the 2 ring bases together.  The easiest stitching method I have found is first insert your needle from behind one of the  pop/pull tabs of your choice through a stitch in round 2 to the front.  Then insert the needle in the next stitch over through the middle and out the back of the bottom ring base.  Now working on the bottom, insert the needle in next stitch over, through the middle and to the top of ring.  Repeat this completely around the ring base until both ring bases are stitched together.  You may need to repeat the stitching for a second round just for added security.


Viola - your ring is ready to wear!!!!


Non Pop/Pull Tab Idea:

This pattern works great for those that are not into pop/pull tabs yet.  Just crochet one ring base and finish it by sewing either an oversized button or smaller button to the top.  It still looks great and gives you another fun flirty upcycled jewelry piece.


I would love to see pics of rings you've made with this pattern.    Send them to me at plastiquerecreations@yahoo.com or twooleydesigns@gmail.com.   

You can also find me on Ravelry under 'crochooley'.


MOVE OVER YARN - MAKE ROOM FOR PLARN!!!!

Friday, December 3, 2010

Pop Tab Bracelet Crochet-Plarn Along

Pop Tab Bracelets have become today's newest fashion jewelry accessory -


But this isn't just any ordinary pop tab bracelet, this is an eco friendly pop tab bracelet because it is made with plarn.

'Plarn' .. it is a commonly used word heard quite a bit in the crafting community. You can find write-ups and tutorials about it on various blogs and websites as well as in YouTube.
What exactly is Plarn? It is a very creative way to recycle plastic bags you bring home from the grocery store, retail stores, and even fast food restaurants.


The word 'Plarn' is derived from 2 words combined:  [Pl (plastic) + Arn (yarn) = Plarn] .


I recently hosted my first Crochet-Plarn Along and had so much fun with it I decided - Hey!!  let's squeeze one more in before saying good-bye to 2010 ....


This Crochet-Plarn Along will be in honor of those that are seeking a 'last minute gift idea' or have a 'hard to buy for person' on their gift list.


The skill level: Easy

This pattern is so super simple that even the newest of new crocheter can do - all you need is:


Materials Needed:
  • Crochet hook - size F
  • Approximately 14 pop tabs consistent in size 
  • 2 standard size plastic grocery bags or 1 of each color
and in less than 30 minutes you’ll have an adorable bracelet just like this.

(except if you're laughing too hard from watching something funny on TV or chatting away with friends ...all of which are completely acceptable and encouraged)


I will share the pattern in 2 sets beginning Tues, 12/7 and last posting on Sun, 12/12.


If you interested in participating, please leave me a comment or email me at plastiquerecreations@yahoo.com.

Find Plastique Recreations:

www.facebook.com/plastiqrecreat
www.twitter.com/plastiqrecreat
shop online at: http://www.crochooley.etsy.com/
http://www.flickr.com/photos/plastirecreations

Sunday, October 31, 2010

Pop Tab Flower Keychain Pattern

I would have never thought in a million years that I would enjoy crocheting different things with pop tabs.

As a recycle artisian, not much gets thrown away. It is just routine that before something is thrown away, anything that can be salvaged is removed from the item (e.g. pop tabs from soda cans, etc.) then placed in individual containers. From that point the stash continues to grow until I'm struck with a creative thought. Until then, I just keep removing and stashing.

One day I noticed my stash of pop tabs was increasingly growing. So I got out the plastic yarn and decided to make a flower. I like flowers. I've seen in Etsy and on other sites where various crafters used the pop tab for the petals. I wanted to be different so instead I used the pop tab as the center instead of the typical adjustable ring method to crochet in the round.

Below is my Pop Tab Flower Keychain pattern:
SKILL LEVEL: Easy
MATERIALS:
· Crochet Hook – Size F and G
· Pop Tab (any size)
· Craft needle for attaching handles and for weaving in ends
· Key Ring
· Plastic Yarn - Main Color (MC): 1 plastic bag / Contrasting Color (CC): 1 plastic bag

Round 1: With F hook and CC, join with sl st in pop tab and sc completely around pop tab (14 sts needed for 7 petals on 1st layer. Note: Make sure you end up with an even number of sts. This determines the # of petals.) Join with a sl st to 1st sc.
Round 2: With MC in flo - for each petal around – *in same st make a sc, hdc, sc, sl st in next st. *Repeat around. Join with a sl st to 1st sc.
Round 3: With G hook and CC in blo of Round 1 sts, for each petal around - *in same st make a hdc, dc, tr,dc, hdc, sl st in next st. *Repeat around. Join with a sl st in a st behind the 1st hdc made. Still working behind the petals, sl st over to tr st, *ch 3, sl st in next tr st. *Repeat around. Join with a sl st to 1st sl st made.
Round 4: With MC and in each ch sp, make an hdc, 2 dc, 2 tr, 3 dc, hdc. (Note: Add more tr sts for height. Add more dc sts for fullness). Join with a sl st to 1st hdc. Fasten off, weave in all ends.
With G hook and both MC and CC, sl st in any st in between round 3 and 4, ch 10 or desired length of key chain. Working behind the ch place the key ring in front of plarn then sl st in the last ch made. (The key ring is now part of the ch) Sl st around the key ring to reinforce strength then sl st behind each ch of the keychain across to 1st sl st made. Join with a sl st to 1st sl st. Fasten off, weave in ends.
Let me know if you run into any trouble making this and I'll talk you through it.

ENJOY!!!!
This pattern is for your personal use only. This pattern may not be sold, published, reproduced-mechanically or electronically, or by any other means, including photocopying from any website(s) or electronic mailing lists, etc… Please do not offer, sell or distribute this pattern in any way to anyone else.

Thanks for visitng - come back soon as I'll be showing off more pop tab designs.