Saturday, November 12, 2011

Free Plarn Pattern - Pop Tab Ring of Elegance


Personally, deciding on what piece(s) of jewelry to wear is just as important as deciding on what outfit to wear.    And, big jewelry pieces are definitely the fad right now.  We see it all the time on tv, in the magazines as well as our own day to day social settings. 

That's exactly the concept behind my newest pop/pull tab design - Pop Tab Ring of Elegance.  This ring proves that recycling can be upcycled to something beautiful.


This ring can easily be crocheted in less than 30 minutes.  This is pattern is perfect for all skill levels.  All you need to know is how to make a chain, the single crochet and reverse single crochet. 


Materials needed:
  • 8 pop/pull tabs
  • Size G crochet hook
  • 1 plastic bag of choice
  • Button or Pin or whatever you want to use for complimenting the pop tabs.    Let your creative juices flow.   Here I've used a button that I removed from an old suit jacket that was tossed in the trash.   But, really anything can be used. 
  • Craft needle

Pattern:


Ring Base - Make 2: 
Round 1:  Using the magic circle, make 8 single crochet stitches in the ring (close the ring not tightly, leave a big enough hole for the button hole to go through), slip stitch in first single crochet stitch to complete round. 

Round 2:  Chain 1 and make a single crochet in same stitch, make 2 single crochet stitches in each stitch around, slip stitch in first single crochet stitch to complete round.

Round 3: (reverse single crochet) Chain 1, now working in the opposite direction make a single crochet stitch in each stitch around and join with a slip stitch in first single crochet stitch to complete round.  Fasten off and weave in both ends.


Now for the finger piece:
Row 1:  Chain 3, single crochet in second chain from hook and in last chain, turn.

Row 2:  Chain 1, single crochet in first stitch and in next stitch.
Repeat row 2 until desired fit. 
Determine fit by placing an end on one side of finger then wrap it around ending on other side of finger.  Don't put the ends together because you want a tight fit as there is some stretch with plastic yarn.


Whip stitch the ends to the right side of a ring base.  Noticed I said 'right side' because the wrong side will be sewn to the back of the pop/pull tabs. 


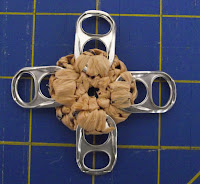
On the other ring base we'll be attaching the pop/pull tabs.  Do this by stitching the right side of 4 pop/pull tabs to the wrong side like clock  hands at 12, 3, 6 and 9.  


Then sew the remaining 4 pop/pull tabs in the empty spaces between the existing pop/pull tabs.  


Don't worry about how it looks because your stitching will be hidden with the other ring base.

Now place your button on top of the same ring base poking the stitch hole through the middle circle and stitch it to the ring base.  Remember, it doesn't matter how it looks because your stitching will be hidden.  
 

You now have 2 separate finished pieces. 


To finish the ring, stitch the 2 ring bases together.  The easiest stitching method I have found is first insert your needle from behind one of the  pop/pull tabs of your choice through a stitch in round 2 to the front.  Then insert the needle in the next stitch over through the middle and out the back of the bottom ring base.  Now working on the bottom, insert the needle in next stitch over, through the middle and to the top of ring.  Repeat this completely around the ring base until both ring bases are stitched together.  You may need to repeat the stitching for a second round just for added security.


Viola - your ring is ready to wear!!!!


Non Pop/Pull Tab Idea:

This pattern works great for those that are not into pop/pull tabs yet.  Just crochet one ring base and finish it by sewing either an oversized button or smaller button to the top.  It still looks great and gives you another fun flirty upcycled jewelry piece.


I would love to see pics of rings you've made with this pattern.    Send them to me at plastiquerecreations@yahoo.com or twooleydesigns@gmail.com.   

You can also find me on Ravelry under 'crochooley'.


MOVE OVER YARN - MAKE ROOM FOR PLARN!!!!

Friday, August 19, 2011

Free Pop Tab Bracelet Crochet Pattern - Lazy 'P' Pop Tab Plarn Bracelet

Pop Tab Bracelets are one of my favorite fashion accessories so I am always thinking of new designs and techniques to create with them.  

I recently completed a new plarn handbag using the traditional Puff Stitch as part of the design.  Impressed by the character the stitch offered to my handbag, it has been added to my list of favorite stitches.  
As I was thinking of my next pop tab bracelet design, I decided to see what a pop tab bracelet would look like using the traditional Puff Stitch.  At first, it lacked the finesse I was expecting.  Then I decided to make the chain 1 through the next pop tab giving the appearance the Puff Stitch was 'laying down on the job' so to speak.  That was it. 

That's how I came up with the name of Lazy 'P'. 

Made with Dollar Tree plastic yarn aka plarn


SKILL LEVEL:  Easy
MATERIALS:
·        Crochet Hook – Size G
·        Plastic Yarn:  Approximately 2 standard size plastic grocery bags (width of strip – approx  ¾”)
·         Approx 18-22 Pop/Pull Tabs (clean & consistent in size).  The # needed will be determined by size of wrist
·        (optional) Craft Needle for weaving in ends
Important Note:   Not all plastic is made the same.  When using plarn, achieving the desired size or gauge is dependent on the texture, thickness and strip width of the plastic yarn. 


ABBREVIATIONS

ch(s) = chain(s)

po = plarn over

sl = slip

st(s) = stitch(es)


Helpful Tips:
·        Read through pattern instructions before beginning.
·        Plastic in general is susceptible to ripping/tearing due to its very nature.   
                o   Weaving in ends - it is best to maneuver your craft needle behind a puff st and not through the stitch to avoid splitting the plastic yarn.
      ·        The edged hole of the pop tab will be always be placed behind a non-edged hole. 
 

Special Stitch:
Puff Stitch:  Po, insert hook in pop tab, po, pull through and bring plarn up higher than normal (3 loops on hook), po, insert hook in same pop tab, po, pull through and bring plarn up to height of rest of stitches (5 loops on hook), *po, insert hook once again into the same pop tab, po, pull through and bring plarn up to height of rest of stitches (7 loops on hook), [IMPORTANT NOTE:  For more puff,  repeat from * until enough puff is achieved.] po, pull plarn through ALL loops on hook. 

Instructions:
With 2 pop tabs overlapped, join plarn with a sl st in overlapped hole, ch 1, place a new pop tab under previous pop tab, make a puff st in that hole.


*Place another pop tab under the previous pop tab, in new overlapped hole make a sl st, ch1 and Puff st.


*Continue overlapping pattern until desired length is achieved ending in last overlapped hole.


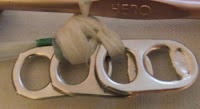
Continue until bracelet is long enough to fit around wrist.  [Fitting Tip – wrap bracelet around wrist overlapping the first and last pop tab.  There is some stretch so no additional tabs are needed to maneuver finished bracelet over hand.] 

Remove hook from st (make a big enough loop so completed work doesn’t come out because you’ll be coming back to it).
Working on opposite side, in 1st overlapped hole join with a *sl st, ch 1 and Puff st.  *Repeat pattern in each overlapped hole to last overlapped hole.   Before connecting the ends, do a second fitting.

                                                             The 1st  hole is skipped as it will be worked when forming the circle.


Form Circle - Overlap the ends together to form a circle.    
Both ends pulled together
 

*Work pattern of sl st, ch1 and puff st in this hole. Finish by making a sl st in 1st puff st.  Fasten off, weave in ends behind the puff st.


*Repeat pattern on opposite side.


ENJOY YOUR NEW FASHION ACCESSORY!! !


Download the Lazy 'P' Pop Tab Plarn Bracelet
(This link will take you directly to my (Crochooley) Ravelry pattern page)

I would love for you to share pictures of your Lazy 'P' Pop Tab Bracelet with me whether it is made with plarn (plastic yarn), tarn (t-shirt yarn), blarn (blue jean yarn), harn (hosiery yarn) or even regular yarn. 

PERMISSIONS
Feel free to make and sell your finished product from this pattern.  LOL - I can't stop you anyway from doing it so I might as well offer you the permission.
However, please do not take credit or offer the pattern as your own.  Please direct them to this page.  If you have any trouble accessing the pattern, feel free to contact me at twooleydesigns@gmail.com and I will email the pattern to you.  

Friday, July 8, 2011

Recycling Zip Lock Sliders

I'm not afraid to admit that I am zipper challenged.  It has actually become a phobia.  After several attempts even while watching YouTube videos, it was time to face reality.  It was time to throw in the perverbial zipper towel but only after I determed what could be used as a replacement.   I prefer zippers over snaps and buttons. 

Then the idea came to me that an alternative to sewing a zipper is attaching a ziplock slider from a Hefty or Ziplock Bag.   I use ziplock bags for everything in my house but the bag because unusable way before the ziplock slider does. 

Here is my creative way to recycle those ziplock sliders and below are a few of my original plarn (plastic yarn) pouch designs with zipslider closure as part of my newest RecycleZip© product line: 

Here are pouches made with a front bow pocket for an added bonus: 


Pouch made with Red plastic yarn and Bow made with Target/CVS plastic yarn
  

Top view to show the recyclezip closure


Pouch made with black plastic trash bags and Bow made with Dollar General plastic bags
 
(FL Gator Fans) Pouch made with Blue plastic bags and Bow made with Orange plastic bags

The most recent addition to the RecycleZip product line is the multi-color pouch:


Made with Home Depot plastic bags and contrasted with Walmart product plastic bags

Top view of zipslider


Made with Dollar General plastic bags and contrasted with Black trash bags
  These are available for purchase in my Etsy shop at www.crochooley.etsy.com !!!!

Thank you for letting me share my creative recycled designs .............

Monday, April 11, 2011

Crochet Plarn-Along / Recycle Zip Pouch with front bow pocket

It's time for another Crochet Plarn-Along. 

Monday, March 28, 2011

Go Green Pop Tab Plarn Handbag


Maybe I should have called this the Spring Handbag instead because it reminds me of spring time with fresh green grass and flowers in bloom.

I designed this handbag with approximately 192 pop tabs and approximately 80 plastic bags.  The plastic yarn used was not only solid green grocery bags but the white with green plastic yarn is none other than Dollar Tree.  .   


Friday, March 25, 2011

Puff Plarn Pop Tab Bracelet

Wednesday, March 16, 2011

Grow It - Wear It Recycled Plant Necklace

I continue to look for creative, innovative and unique ways to reinvent plastic.  Quite honestly, this time I surprised even myself.  


Grow It-Wear It Recycled Plant Pendant w/21" Bronz Chain ($19.99)

Introducing my newest creation, Grow It - Wear It  Recycled Plant Necklace.   This micro-miniature little lovely was made from the neck of a water bottle.  A second cap is used for the base which is secured on and there's absolutely no chance of it falling off.  The top cap unscrews so you can make up the planter then screw it s back on.

It is very light around your neck and is available in Cord or Chain.


Grow It-Wear It Recycled Plant Pendant w/21" Brown Cord - $14.99
 Other Necklace options available (not pictured yet) -
Cord - Gray and Black
Single Chain - White
Double Chain - Bronz or White

Please come back and visit soon as I will be introducing more micro-miniature plant pendants that are even more unique !!! 

Thanks for letting me share my newest product line with you !!!


Friday, February 25, 2011

Pat's Powerful Pink Plarn Tote


There is nothing more flattering and rewarding to a designer than when a special customer makes a request for you to create something customized to their specifications.  Well,  my special customer is Pat from Gainesville, FL who recently asked me to design a 12 x 12 round pink tote using a tight stitch and drawstring handle.     


Of course, it would have been so easy to make this bag using only the single crochet stitch.    I just couldn't  do that.  A special customer deserves a special stitch which is why I chose to make this bag using the extended single crochet stitch.  The extended single crochet offers a unique texture while maintaining an attractive appearance.   And of course, durability and strength is a definite must.


The base and bag is made with over 130 pink plastic bags.  The top and bottom was edged with white plastic yarn using the reverse single crochet stitch.   

And the best part about this customized order - the customer is quote
"I am 150% happy!"


Do I really need to say anything more?  

Thanks for letting me share this with you .................
Teresa
www.crochooley.etsy.com


Wednesday, January 19, 2011

Pantyhose & Plarn Multi-Purpose Scrubby Crochet Pattern


Dollar General plastic bag & black pantyhose

My scrubbies are crocheted with plastic yarn and pantyhose held together.  Don't be fooled by the plastic.  When you combine both material together, you get one thick and durable scrubby.  

These are machine washable and dishwasher safe.  I've been making these scrubbies for years to accomplish so many different cleaning tasks.  Mostly I use them for scrubbing pots and pans. However, I have found they are also good for ...


- cleaning the bugs off car windows
- cleaning my glass stove top and microwave messes because my son forgets to cover his dish
- they work awesome on cleaning bathtub rings and shower walls


Before we start - the following tutorial links show you how to prepare the pantyhose and plastic bags into yarn:
Pantyhose:  (1/2 to 3/4" width suggested)
http://plastiqrecreation.blogspot.com/2009/07/how-to-make-hosiery-pantyhose-yarn-aka.html

If you haven't crafted with pantyhose before, it is very different than plarn or regular yarn.  Due to the very nature of it being nylon, you don't get a 'tightning' feel with it.  My suggestion is don't pull it, use the same tension as the plarn.

Plastic Bags:  (1 to 1 1/4" width suggested)
Double Strand: http://plastiqrecreation.blogspot.com/2009/04/double-strand-cutting-and-connecting.html
Single Strand:  http://plastiqrecreation.blogspot.com/2009/04/continuous-single-strand-strip-cutting.html 


Meijer plastic bags and red pantyhose

You will need:
  • Crochet Hook Size J (or K depending on thickness of pantyhose/plarn)
Important Note:   Not all plastic is made the same.  When using plarn, achieving the desired size or gauge is dependent on the texture, thickness and strip width of the plastic yarn. 
  • 1 pair of adult size pantyhose (2 adult legs will net 3 scrubbies)
  • Approx 1 1/2 standard size plastic bags (will net 1 scrubbie or 5 standard size plastic bags for 3 scrubbies)
  • (optional) Craft needle or F Hook for weaving in ends  

Gauge:  There really isn't any but typically 3 rounds measure approx 3" to 3 1/4" wide.

Pattern is worked with holding 2 strands of plastic yarn and 1 strand of panthose held together.

Round 1:  Beg with a slip knot, ch 3 and join with sl st in 1st ch to form ring or use adjustable ring method (click on the link for a tutorial) make 6 sc in ring.  Join with sl st to 1st sc, tighten and close the starting hole.


Round 2: Ch 1 (counts as 1st sc) make another sc in same st, make 2 sc into each st around, join with a sl st to beginning ch 1.

Round 3:  Ch 1 (counts as 1st sc) make another sc in same st, *1 sc in next st,  2 sc in next st. *Repeat around. 

(add more rounds if you want a bigger scrubby) 

Publix plastic bags and green pantyhose

FO and weave in ends.

If you have any questions or find discrepancies, please leave me a comment or email me at plastiquerecreations@yahoo.com


Abbreviations:
Beg – Beginning
Ch – Chain
FO – Fasten Off
Sc – Single Crochet
Sl St – Slip Stitch
St – Stitch


COPYRIGHT INFO:
This pattern is for your personal use only.   This pattern may not be sold, published, reproduced-mechanically or electronically, or by any other means, including photocopying from any website(s) or electronic mailing lists, etc…  Please do not offer, sell or distribute this pattern in any way to anyone else.  ©2010


*Please do not copy my patterns on your blog site or post my patterns on Internet sites. I do not allow my patterns to be republished without expressed written permission. Posting of my patterns, without written permission is in violation of my copyrights and is content theft.

Thursday, January 13, 2011