Sunday, July 29, 2012

Free Pattern: Pop Tab Plarn Heart applique


SKILL LEVEL: Easy

MATERIALS:
· Crochet Hook – Size F
· Plastic Yarn:  1 plastic bag
· 4 pop/pull tabs (clean, same size)
· Craft needle for weaving in ends

SIZE: Width: 3” 

Instructions:

Join plarn with slip stitch.  Make a single crochet in same hole.

Lay 2nd pop tab over 2nd hole of 1st pop tab, 2 single crochet stitches through both holes.

Lay 3rd pop tab over 2nd hole of 2nd pop tab, 3 single crochet stitches through both holes.


Single crochet in next hole.

5 single crochet stitches in next hole to form corner.

Make a single crochet stitch in next hole.  In same hole,  start a single crochet stitch but do not plarn over to finish the stitch,  instead insert hook in next hole, plarn over and pull through, plarn over and pull through all 3 stitches on hook to complete the single crochet stitch.  

Single crochet in same in same hole, 3 more single crochet stitches in starting hole, join with slip stitch at top of beginning single crochet stitch.  This makes a small pop tab heart.  Continue the pattern to make a larger heart.  

Round 2:  Chain 3 is 1st double crochet stitch,  double crochet in same stitch,  2 double crochet in next stitch,  double crochet and half double crochet in next stitch, single crochet in next 2 stitches, half double crochet in next stitch, 2 double crochet in next stitch (bottom mid point of heart), half double in next stitch, single crochet in next 2 stitches, half  double and double crochet in next stitch, 2 double crochet in next 3 stitches, half double and double crochet in next stitch, single crochet in next 3 stitches, half double and double in next stitch, 2 double crochet in remaining stitch, join with slip stitch in top of beginning chain 3. 

Finish off, weave in ends.

For a different look, reverse single crochet around outside of heart.  To make a small bow - chain 30 then slip stitch in each chain back to 1st chain made.  Pull each chain strand from behind heart through each hole to front, tie to make bow.   


I did this one with the AT&T orange with blue letters plastic bag the telephone books come in and reversed single crochet in S&S Foods plastic bag that is white with orange/blue letters. 

Please don't hesitate to email me at plastiquerecreations@yahoo.com if you have any questions.

You can also friend me on Facebook at www.facebook.com/plastiqrecreat
I'm in Ravelry under Crochooley

Friday, July 27, 2012

Tutorial - How to Make a Continuous Strand of Yarn using a flat textile like sheets or curtains


Since creating the tutorial on how to make blue jean yarn (http://plastiqrecreation.blogspot.com/2009/10/how-to-make-handspun-blue-jean-yarn.html), I've learned with experience that once a seam is cut into, it becomes compromised making it vulnerable to falling apart.   So while I'm in the process of making something, it falls apart.   I have been lucky enough that some seams that are cut through are sewn stronger and stay in tact even after the fray process.  But the majority of time I end up with multiple strands of various lengths.  As a result, I spend more time than I want sewing the ends together.  And, yes this can be time consuming.

If there is a way to make yarn in a single strand with a tube, then there is a way to make a continuious strand of yarn without a tube.  I could use the 'make a slit and connect the strips' but that for me is just too time consuming.  If you haven't learned by now, I am impatient.

After much practice, I finally figured it out.    The awesome thing is this cutting method can be used on any type of material like sheets, curtains, etc..

For this tutorial, pants are used.   Feel free to skip down to the 'Cutting Method':


Cut legs off below crotch.

Cutt off bottom hem or pull out the stitches of bottom hem. 


  Rip out side seams.   

1 pair of pants gives you 4 strips  


Cutting Method 


  Take one layer and match up the sides lengthwise.


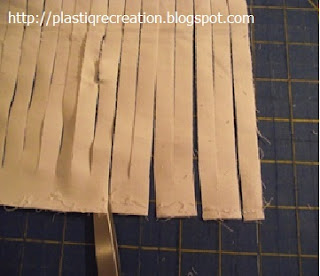
Lay flat on cutting board. Starting at right edge, measure in desired width of strip, cut through bottom fold up to approx. 1/4" to 1/2" below top edge. Recommended width for each strip is not less than 1/2". 


This is what it will look like when cutting is done.


Lay piece flat.


Starting at bottom edge, cut through to make 1st strip. 


Each cut after 1st will be every 2nd strip to end.


This is what it will look like when all done.


Now working on the opposite side.


Starting at bottom edge, each cut will be opposite of other side.
                                                    

 If it helps, the strip looks like an upside 'V'. Cut through the middle of the 'V'.   
  

After the continuous strip is completed, go back and look at the strips and cut closer to the edge.


Not too close because you want it to hold up through the wash and driy process.


Here is what it looks like right after cutting but before wash/dry processing.

The wash & dry process gives yarn the frayed look.


Here are a few other pant yarns that I have made.  I would love to know what types of yarn you make with this tutorial.  Let me know if additional clarification is needed.   By all means don't hesitate to email me at plastiquerecreations@yahoo.com if you have any questions.